Custom CSS Manual English
Advice for Action
Information about this Manual
Date: 2026-05-09
Tone: Informal
Target Audience: Admins, Power Users, Agencies
The manual is available in German and English
LayerCraft Studio Custom CSS replaces the long, cluttered Customizer field with actual CSS files complete with folders, assignments, and previews.
You work in a more structured, confident, and faster manner – regardless of the theme.
Inhaltsverzeichnis
- 1. System Requirements
- 2. Installation & Updates
- 3. Roles and Permissions (Capabilities)
- 4. General Settings
- 5. Areas & Files
- 6. File Explorer (Right Side)
- 7. Tabs (Left Column)
- 8. Editor (CSS)
- 9. File Table
- 10. Assignments
- 11. Import
Additional CSS - 12. Live Preview
- 13. Revisions
- 14. Sorting & Loading Order
- 15. Header- und Footer-CSS
- 16. Typical Workflows
- 17. Troubleshooting
- 18. Security
- 19. Version Maintenance
- 20. Performance Notes
- 21. Keyboard Shortcuts (Monaco)
- 22. Uninstallation
- 23. Operation: Basic Orientation
- 24. Operation: Settings
- 25. Usage: Create a New CSS File
- 26. Operation: Open and Edit File
- 27. Operation: Status, Range, and SortingSortierung
- 28. Operation: Set Assignments
- 29. Operation: Live Preview
- 30. Usage: CSS Favorites
- 31. Operation: Commentary and Description
- 32. Operation: Revisions
- 33. Usage: Importing „Additional CSS“
- 34. Usage: Complete Example Workflow
- 35. Versioning & Commits
- 36. Disclaimer (Beta)
- WordPress 6.3 or higher
- PHP 8.0 or higher
- Write permissions for
/wp-content/uploads/ - No theme dependency; works even after switching themes
Technical Names:
- Plugin directory:
lcs_custom_css - Main file:
lcs-custom-css.php - Text domain and admin slug:
lcs-custom-css
Under LCS Custom CSS > Settings, you can configure whether tables and/or the upload directory are removed upon deletion.
Plugins > Add New > Upload Plugin -> lcs_custom_css.zip -> Install Now -> Activate
Alternatively, copy via FTP/SCP to /wp-content/plugins/lcs_custom_css/ and activate in the backend, or use WP-CLI: wp plugin activate lcs_custom_css/lcs-custom-css.php
Update: Follow the same steps, overwriting the directory; files and settings will be preserved.
- Under
LCS Custom CSS > Settings, configure the following permissions per role: manage– allow all actions; the Admin always has full accessview– view and loadedit– create, edit, savedelete– deleteimport– import Customizer CSSsnippets– reserved for future extensionssettings– change settings- Only administrators can disable the global `Commits` setting in plugin settings; automatic versioning remains active.
Role: Under „Role,“ select the user group for which you wish to adjust permissions in the „Permissions for Role“ section.
By default, the following user groups are available:
Administrator; Editor; Author; Contributor; Subscriber
Plugin Language: The language of the plugin interface per user.
This setting is independent of the WordPress admin language.
Appearance: The visual theme of the plugin’s admin interface per user. Available options are Light, Dark, and Follow System Setting. The default is Light. When set to Follow System Setting, the appearance adapts to your operating system or browser settings. This option applies only to LCS Custom CSS, not to the rest of the WordPress backend.
Permissions for Role:
- Read & View Menu: Can see the Custom CSS menu and load files.
- Create/Edit/Save: Can create, edit, and save CSS files, as well as modify assignments.
- Delete: Can delete CSS files.
- Import Customizer CSS: Can initiate the import process from the Customizer.
- Manage Snippets: Reserved for future snippet CRUD (Create, Read, Update, Delete) and import functionalities.
- Settings: Can access this settings page and modify permissions.
- All Rights (Legacy): Grants all of the above permissions.
Uninstall Behavior: Do not delete anything / Tables only / Tables plus Upload Directory. This setting takes effect when the plugin is deleted (not when it is merely deactivated).
Primary Color: The accent color for the plugin’s admin interface. The default is #7B3FE4. You can manually enter a HEX value, use the color picker, or click Reset to revert to the default. Hover, active, and selection colors are automatically derived from this setting. This setting is permanently stored in WordPress and does not affect the public-facing frontend.
Default Preview URL: The default URL used for the live preview. The default value is home_url('/'). A dedicated staging domain is supported; please observe CORS and Mixed Content requirements.
Default setting for the live preview for tabs without a dedicated URL.
Please use the domain/protocol of the preview page to avoid CORS/Mixed Content issues.
Version Info: The settings display the plugin version and release date.
global: Base styles, tokens, utilities; always loaded
header: Early in the enqueue order within the <head>; navigation, above-the-fold content, critical fixes
footer: Late in the same enqueue order within the <head>; non-critical styles and late overrides
- 9. page/post/archive/category/tag/custom_post_type: Context-specific files, controllable via assignments
- Sorting: A number assigned per file; lower numbers load earlier. Recommendation: Increments of 10 (e.g.,
10,20,30)
General
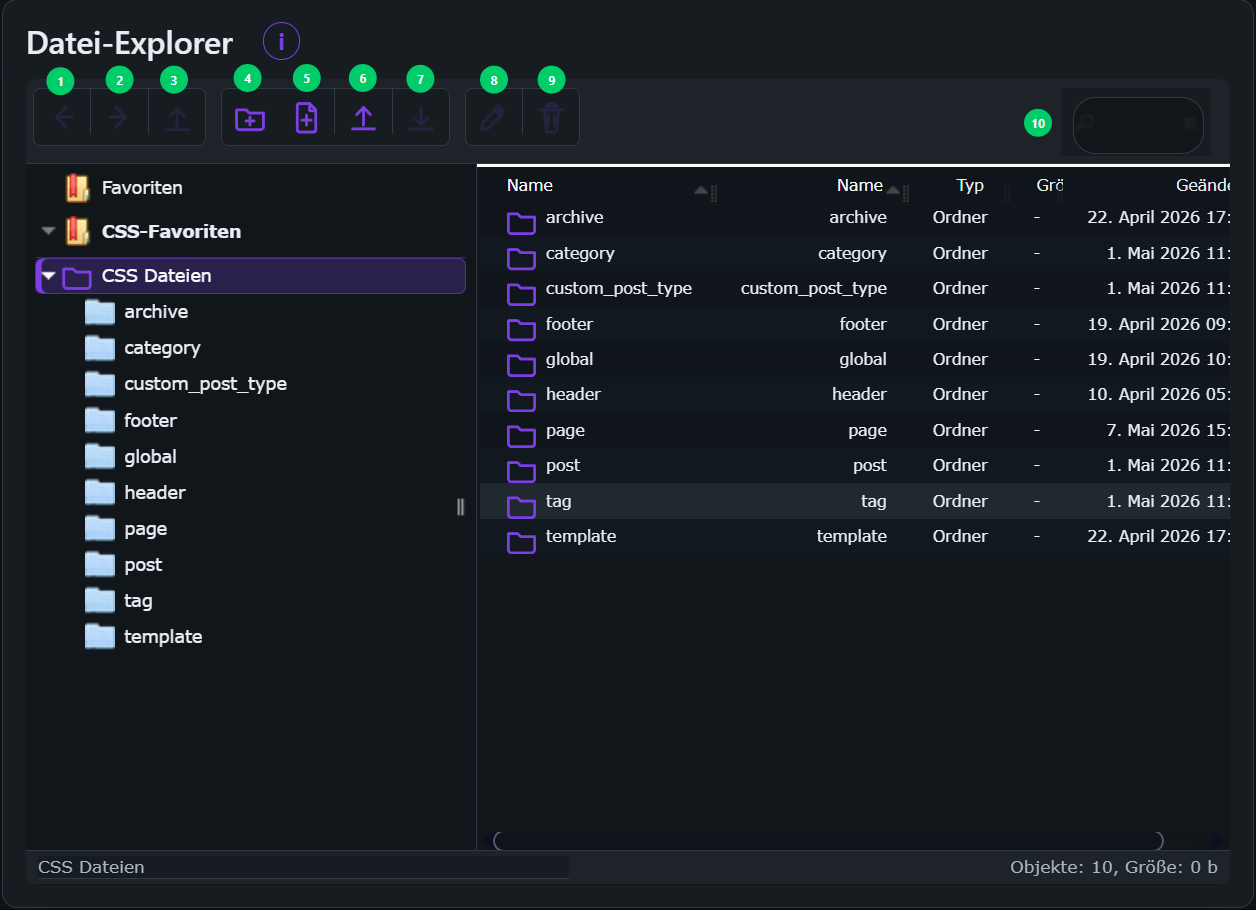
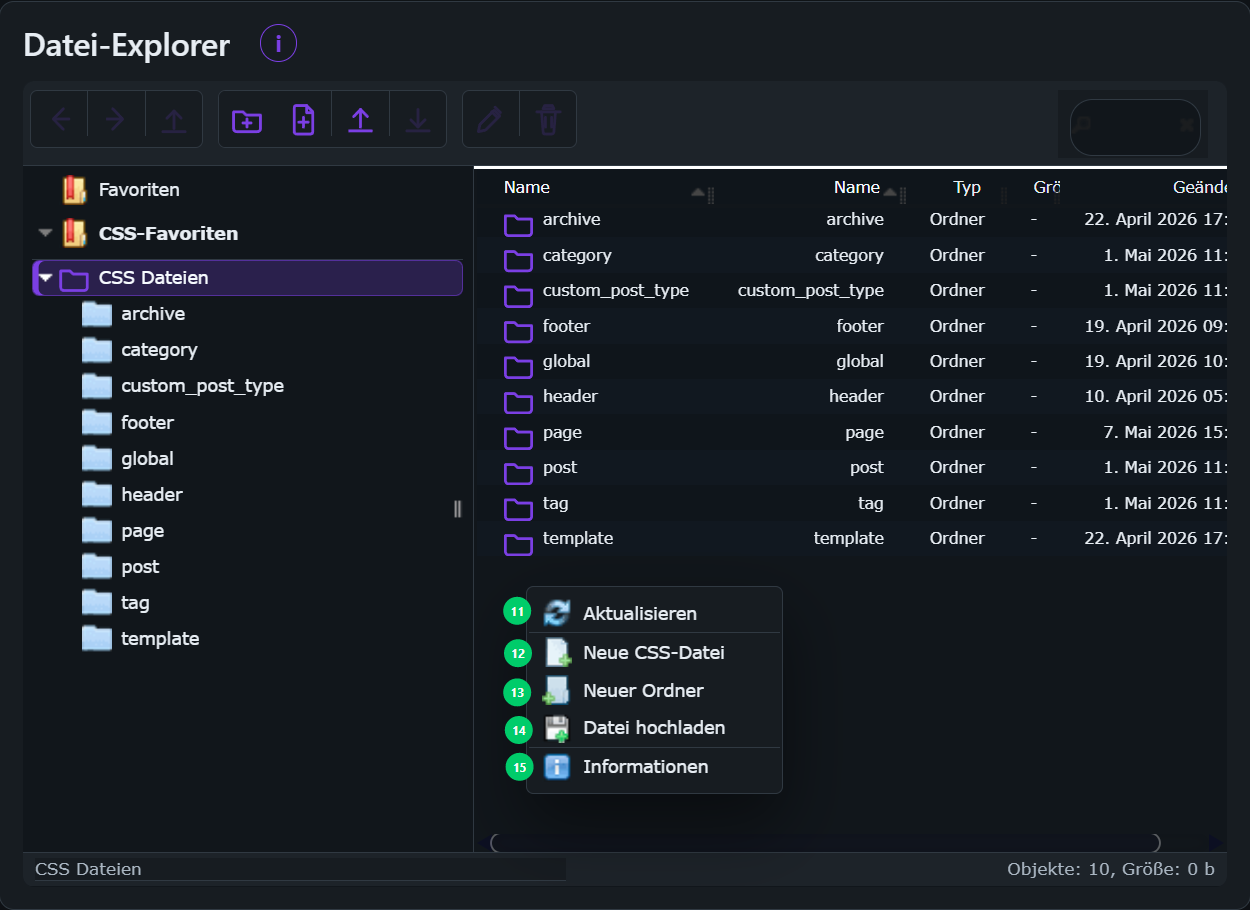
- The Explorer is based on
elFinderand is located on the right side of the upper workspace area. - The Explorer adheres to the plugin’s visual styling. In Dark Mode, the toolbar, file list, directory tree, dialogs, context menus, and hover/selection states are displayed in dark tones.
- The visible root directory is
wp-content/uploads/lcs-custom-css/.
It is not possible to navigate to other directories located above this level. - Visible structure:
archive,category,custom_post_type,footer,global,header,page,post,tag,template - The Explorer is intentionally compact and is not designed to function as a full-screen file manager.
- The
(i)button in the Explorer title bar provides brief information regarding the root directory, as well as click and double-click behaviors. - The currently active row in the Explorer is intentionally highlighted with a bolder shade of the configured primary color to ensure that the selection and associated icons remain clearly visible.
Controls
- Toolbar Navigation: (1) Back, (2) Forward, (3) Up
- File Operations: (4) Create Folder, (5) New CSS File, (8) Rename, (9) Delete
- Data Transfer: (6) Upload = Import, (7) Download = Export
- Additional Functions: Reload, (10) Search, Info
Display
- The toolbar utilizes enlarged local SVG icons; no assets are loaded from the internet.
New File
- (5) The
New Filefunction is integrated directly into the Explorer toolbar as a dedicated button. - (5)
New Filecreates a new CSS file within the currently open Explorer folder. - Right-clicking on an empty area within the right-hand pane of the Explorer also reveals the (12)
New CSS Fileoption. - When creating a new file, you will be prompted to enter a filename. Please use a filename ending with the
.cssextension. – Upon successful creation, the file appears immediately in the Explorer and the file table, and opens directly in a new editor tab.
Opening Files
- Clicking on a file selects it.
- Double-clicking on a CSS file copies its relative path and opens the file directly in the editor.
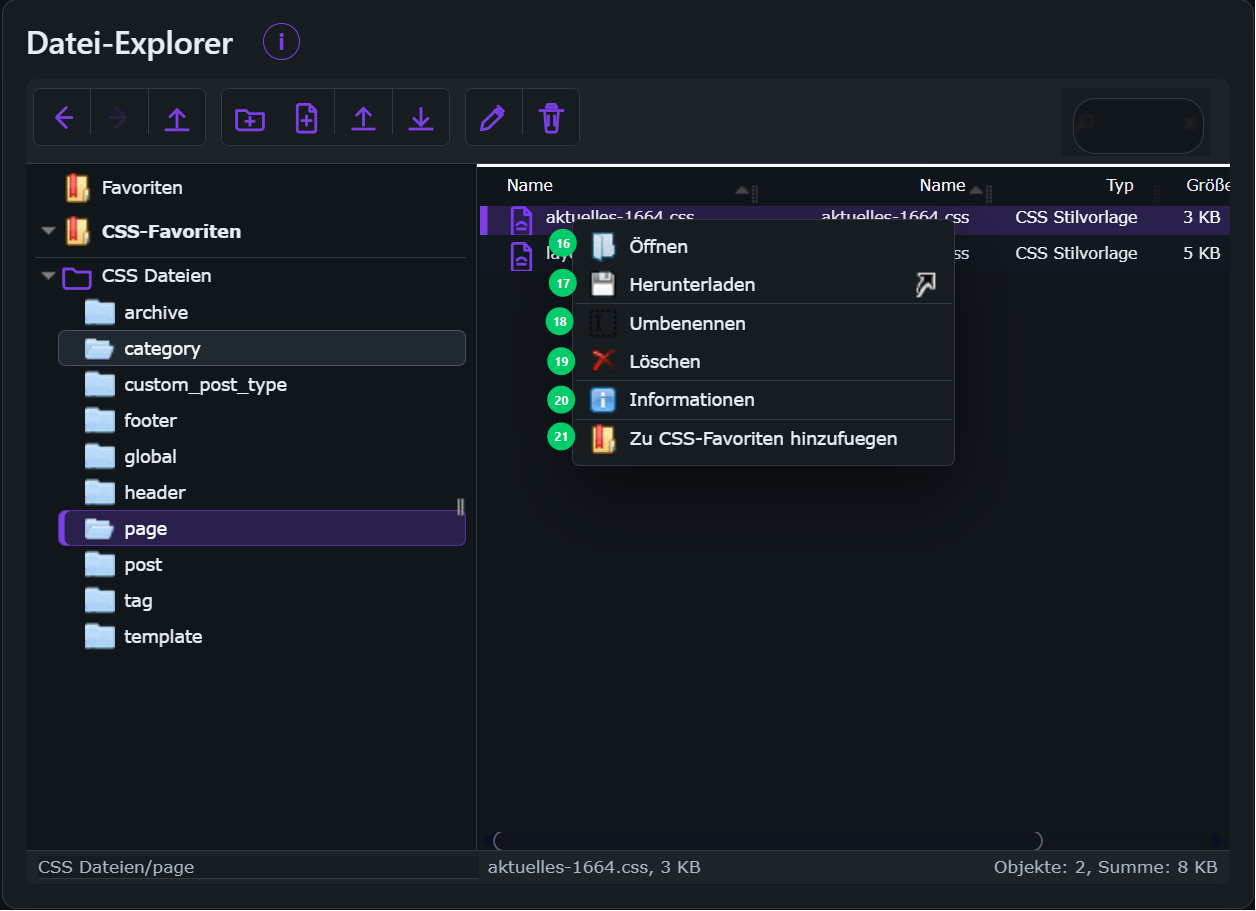
- Right-clicking on a CSS file opens the file context menu.
From there, you can
(16)Open, (17)Download, (18)Rename,
(19)Delete, (20) viewInformation, or
(21) save the file as a CSS file favorite viaAdd to CSS Favorites.
Favorites:
- CSS file favorites appear on the left in their own dedicated
CSS Favoritessection. - Clicking on a CSS file favorite opens the file directly in an editor tab.
- Right-clicking on a CSS file favorite offers the option to
Remove from CSS Favorites. - CSS file favorites are stored locally in the browser. They serve as a navigational aid within the Admin interface and do not constitute file metadata stored in the plugin database.
- The native elFinder
Favoritesfeature remains available for folders; for files, the plugin utilizes its own dedicatedCSS Favoritessection.
Folders:
- Double-clicking on a folder opens that folder within the Explorer.
Security Framework:
Root protection is enforced server-side via the WordPress Connector.
Only *.css files can be created, renamed, or uploaded.
Other file types—such as php, js, html, exe, cmd, or sh—are blocked.
General:
- The block titled „How it works in 3 steps“ is collapsed by default and serves as an optional quick-help guide.
- The information regarding the tabs is located within an „(i)“ button situated directly next to (1) „Create New File.“
- Descriptions for the form fields are displayed in a space-saving manner within small „(i)“ buttons located directly next to the field name.
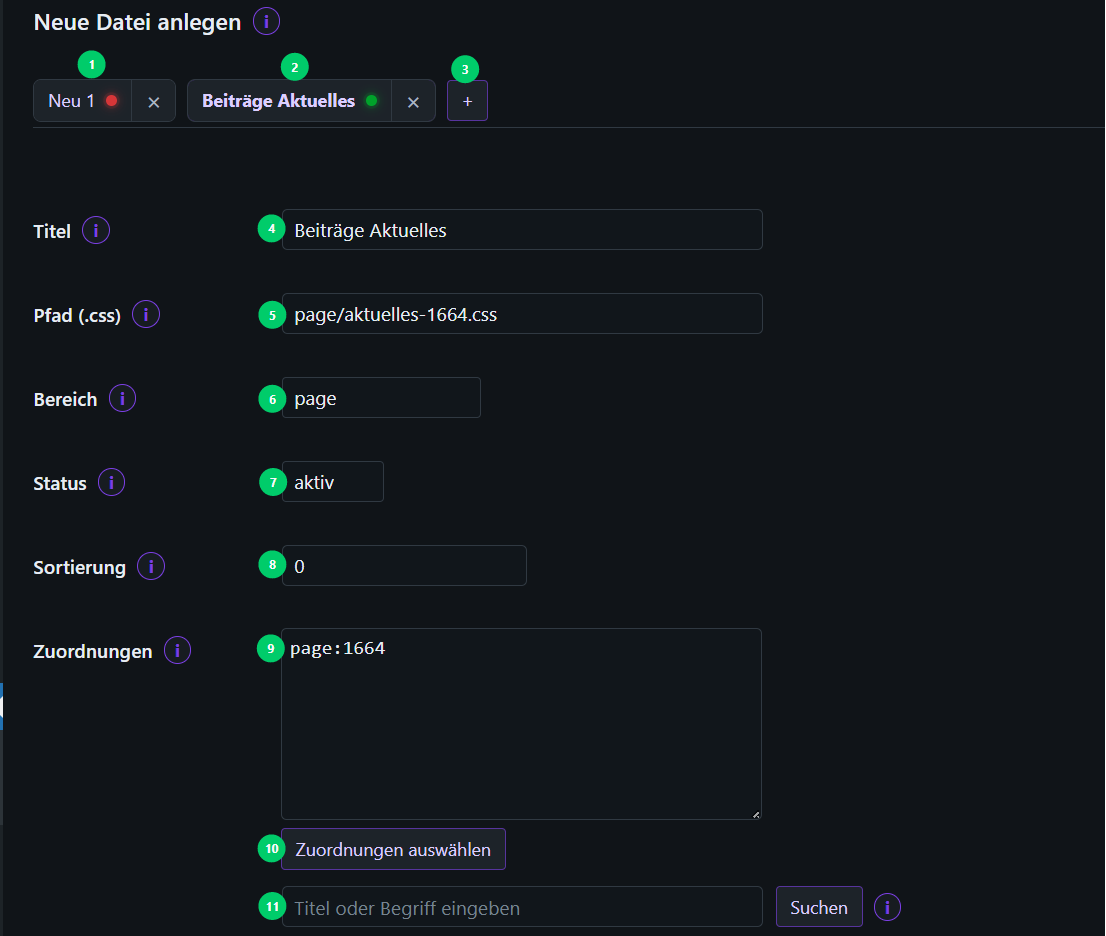
- Tabs: „+“ = new file; green dot = saved; red dot = unsaved. The Preview URL and Selector settings are maintained independently for each tab.
- Multiple tabs can remain open simultaneously. Each tab features its own close button; a middle-click (mouse wheel click) will also close the tab.
- „Close Tab“ applies only to the currently selected tab. If there are unsaved changes, a confirmation prompt will appear.
- If the last remaining tab is closed, the UI will automatically open a new, empty tab.
Input Fields:
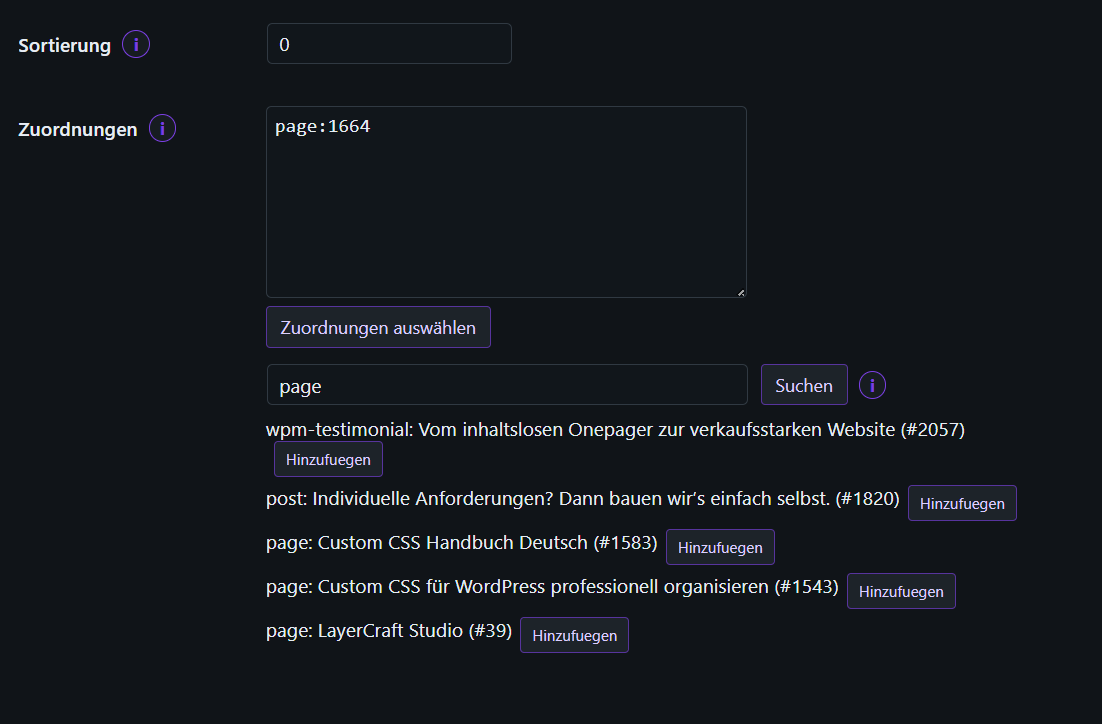
(11) Enter Title or Term: Use this field to easily search for keywords or page titles, which can then be added to your assignments
Optional field (4) „Title“: Located above the file path; if a title is entered here, it will be used as the tab label instead of the file path.
(5) „Path (css.)“: Displays the file path for the CSS file.
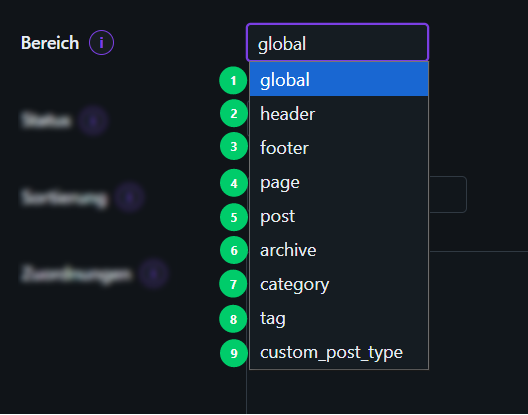
(6) „Scope“: Indicates the specific area where the CSS rules should be applied.
The following scopes are available to you:
global; header; footer; page; post; archive; category; tag; custom_post_type
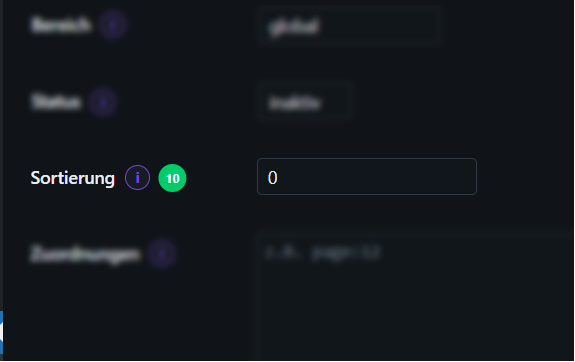
(7) Status: Displays Active/Inactive
Active: CSS is loaded
Inactive: CSS is not loaded
(8) Sorting: Enter the value for the CSS loading order here; the lower the value, the higher the priority (0 = maximum priority)
(9) Assignments: Lists the pages currently assigned to the CSS
(10) Select Assignments: Displays all active pages; you can easily select the specific pages where the CSS should be applied
General:
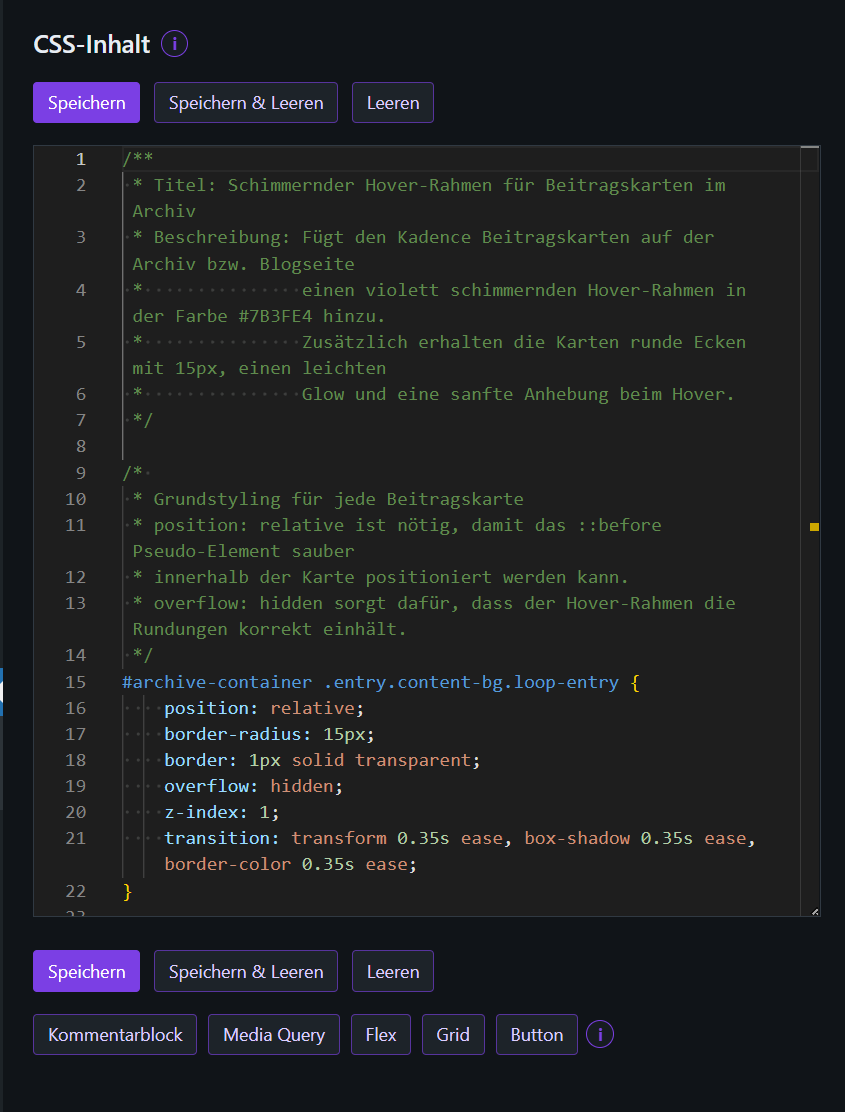
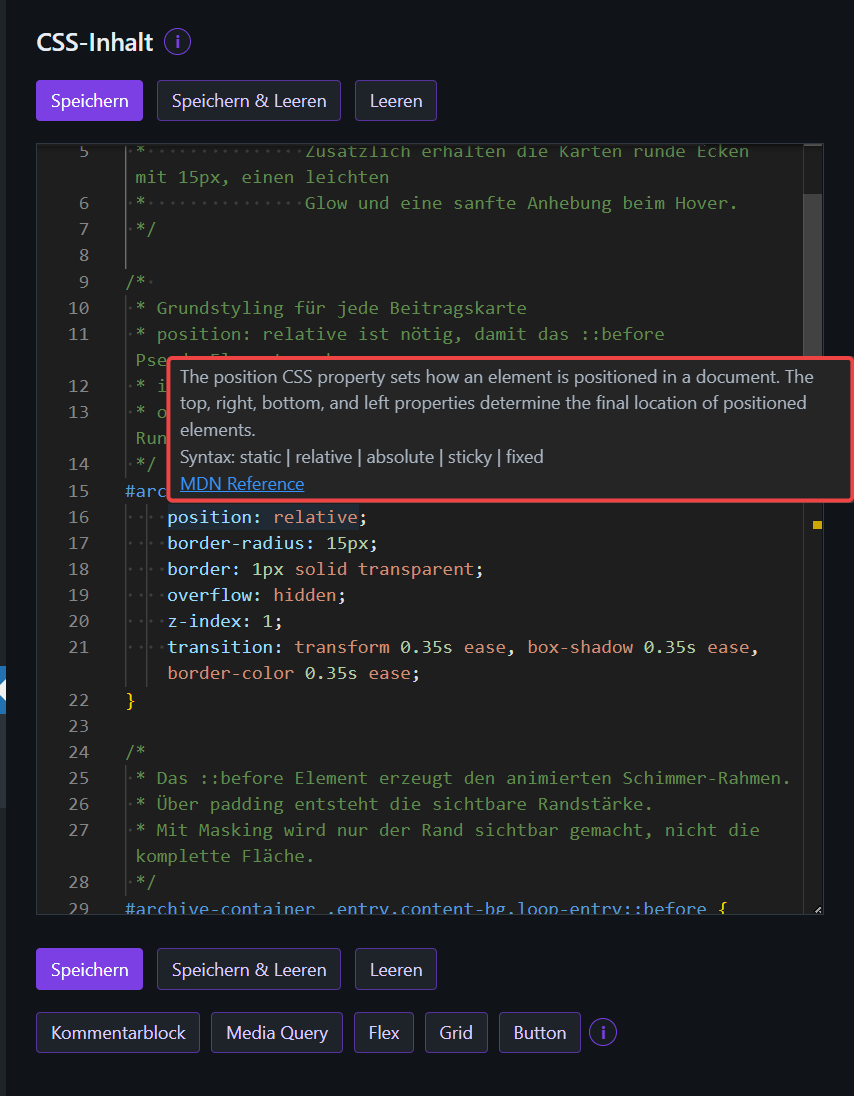
- Monaco Editor featuring syntax highlighting, word wrap, multi-cursor support, and
Find and Replace (Ctrl/Cmd + F). - Monaco follows the plugin’s theme settings:
vsin light mode,vs-darkin dark mode. - The editor’s information tooltip appears as an
(i)button located directly next to „CSS Content.“
Usage:
Ctrl/Cmd + W closes the active tab, triggering the same „unsaved changes“ prompt as the „Close“ button.
The same three actions are available both above „CSS Content“ and directly below the code box: „Save,“ „Save & Clear,“ and „Clear.“
„Save“ saves only the active tab via AJAX and keeps it open.
„Save & Clear“ saves only the active tab via AJAX and subsequently replaces only that tab with a blank one.
Other open tabs remain unchanged during this process, even if they contain unsaved changes.
„Close Tab“ applies only to the currently selected tab. If there are unsaved changes, a confirmation prompt will appear.
If the last remaining tab is closed, the UI automatically opens a new blank tab.
„Clear“ discards the current input (after a confirmation prompt) and saves nothing.
Ctrl/Cmd + S corresponds to „Save.“
General:
The text not assigned appears in red only when no assignment can be detected.
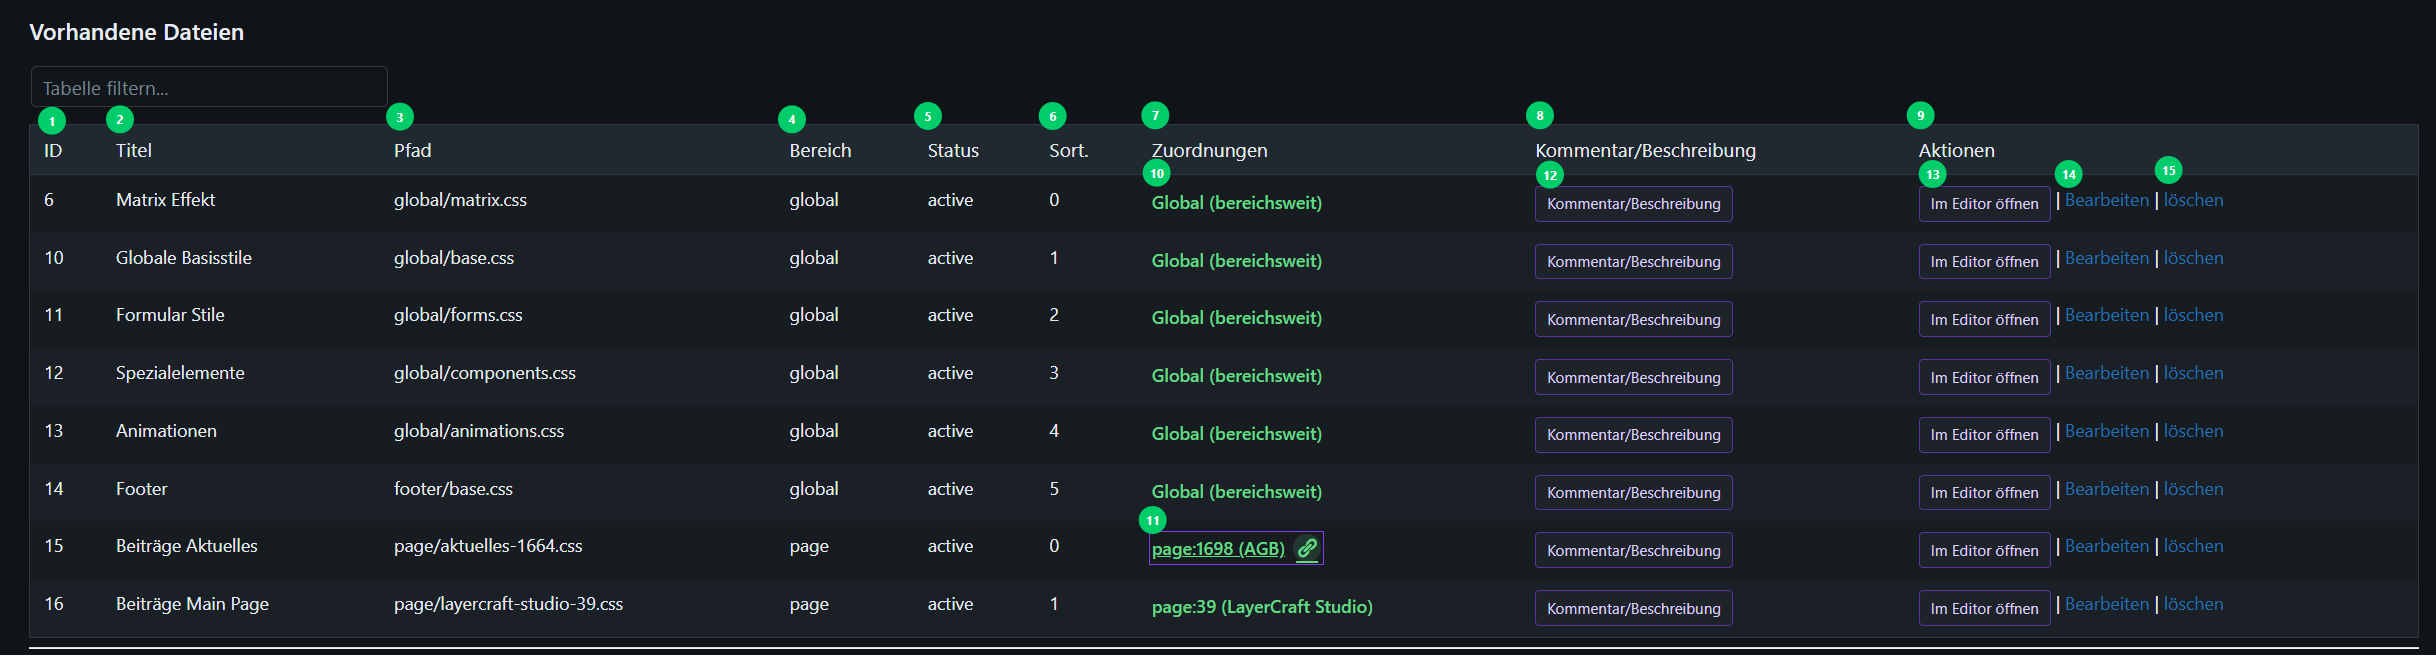
The table displays (1) ID, (2) Title, (3) Path, (4) Area, (5) Status, (6) Sorting, (7) Assignments, (8) Comment/Description, and (9) Actions.
The table follows the plugin’s visual styling; in Dark Mode, it is displayed with dark rows, a dark header, and matching hover/detail rows.
The Path remains visible in the table at all times, even if a title has been assigned.
For space-saving reasons, column (7) Assignments displays only the (10) first assignment.
If there are (11) multiple assignments, a „multiple items“ icon appears to the right of the first assignment.
Clicking on the displayed (11) assignment (within the table) toggles the detail row—containing all assignments—open and closed.
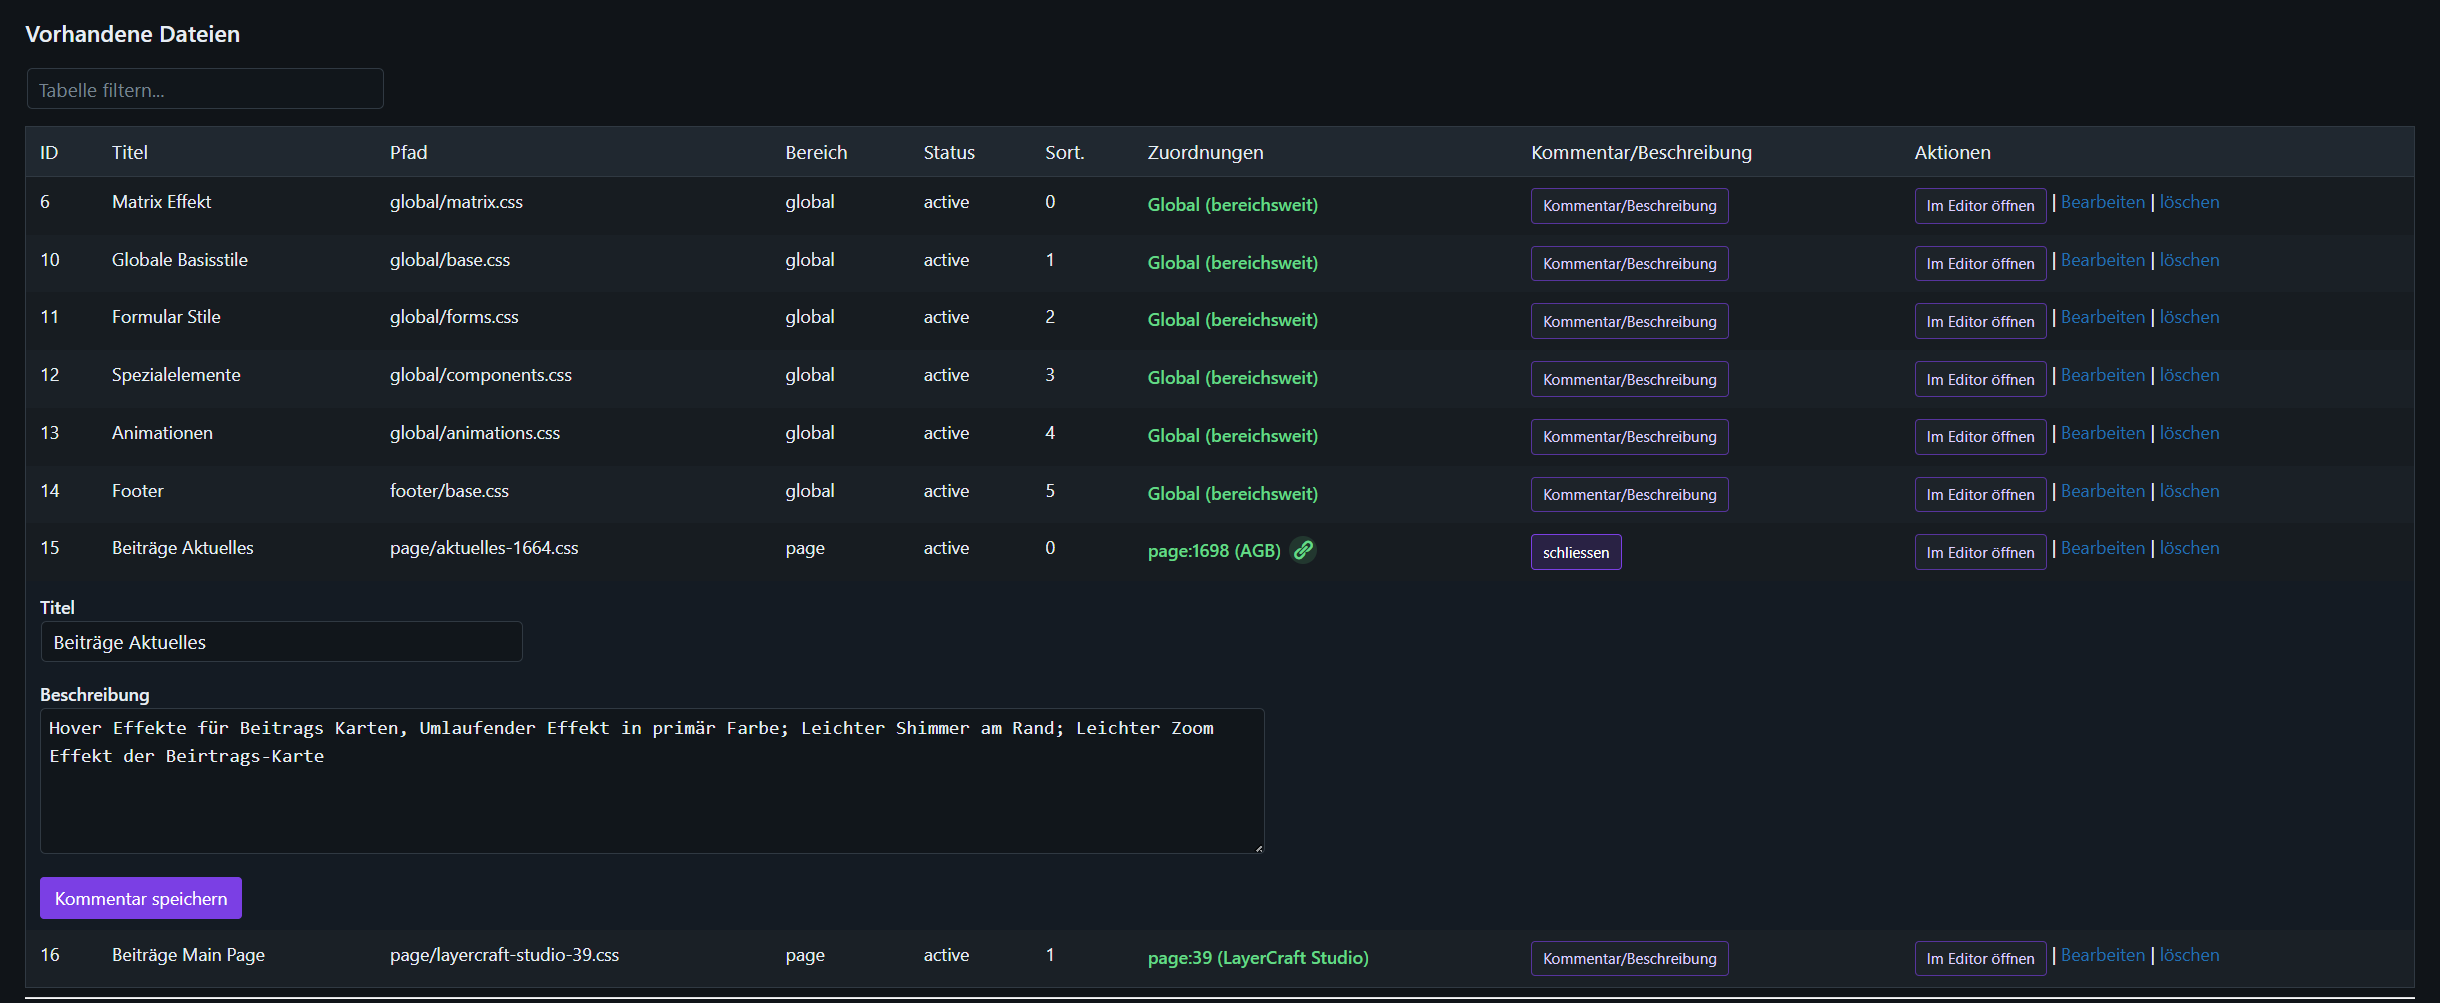
The (12) Comment/Description column allows you to open an additional row containing a title and a multi-line description.
Saving the (2) title and description within this additional row is a manual process and does not generate a revision.
Files with an explicit object assignment, an implicit path assignment, or an area assignment are displayed in green within column (7) Assignments.
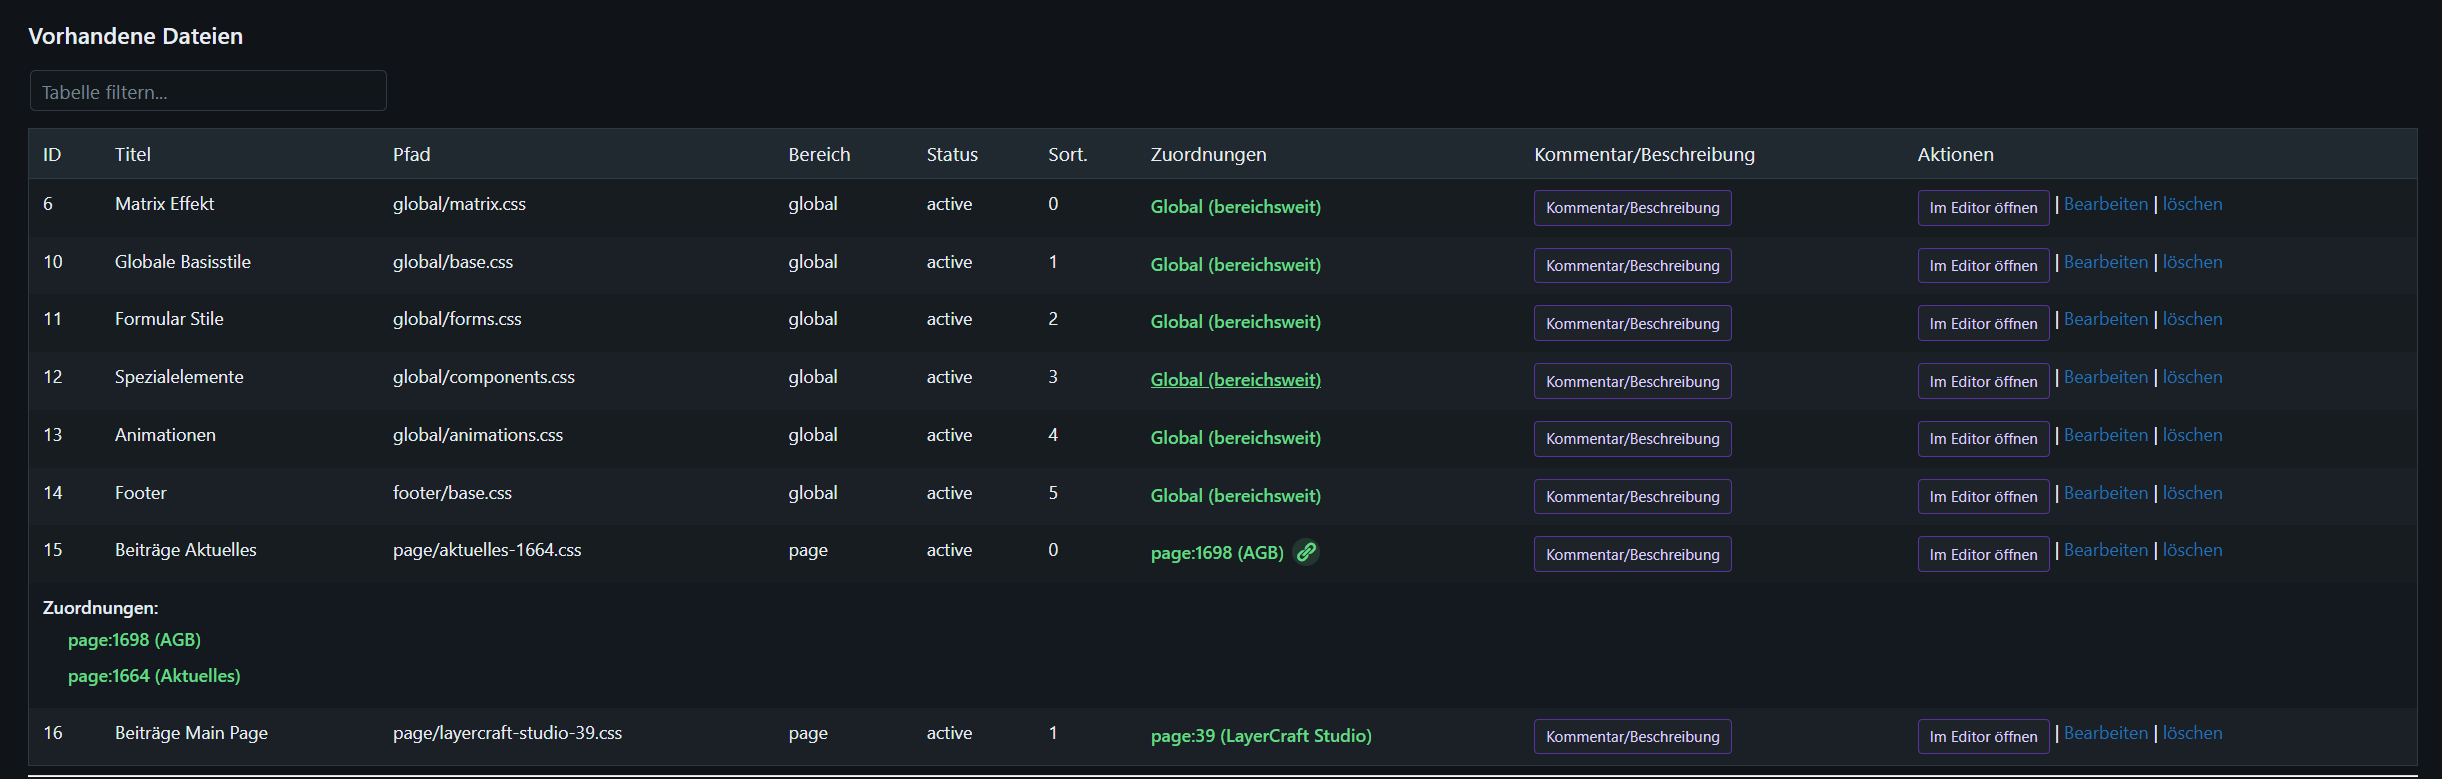
Format: one line per assignment, e.g., page:12, post:34, category:5, tag:7, product:81, home:0, product_archive:0
Leave blank = applies to the entire scope
A modal with AJAX search functionality is available
Multiple assignments are possible; in the table, only the first assignment—plus a multiple-assignment icon—will be displayed
Scope files without a specific object assignment (e.g., global, header, or footer) are considered assigned and are highlighted in green within the table
The Import button is located in the editor area; the import permission is required to use it.
The target destination is global/imported-additional-css.css.
The original content in the Customizer remains intact.
After importing, you should verify the status and sorting, and split up the content if necessary.
General:
- The tooltip for the Live Preview appears as an
(i)button located directly next toLive Preview (Beta). - The tooltip for the Picker appears as an
(i)button located directly next toSelector Follows Cursor. - Pseudo-elements such as
::beforeand::aftercannot be rendered as distinct nodes; instead, the base element is displayed. - Scripts within the iframe are removed to prevent jQuery or plugin errors; consequently, dynamic functionality may be missing.
- The
CSS Contentarea and the Preview share a dedicated full-width row positioned beneath the Form and Explorer sections. - In wide viewports, the Editor is positioned on the left and the Preview on the right; in narrow viewports, both are stacked vertically.
- If the Preview is undocked into a separate window, a narrow Preview control panel remains visible on the right side, adjacent to the Editor.
- In wide viewports, the Editor then occupies approximately two-thirds of the available width, while the control panel occupies approximately one-third.
- Below a viewport width of approximately 1280px, the existing stacked layout behavior is maintained.
- The Explorer and Preview are distinct areas; the Explorer remains „sticky“ (fixed) in the top-right corner and does not overlap the Preview.
- The Editor and Preview windows can be resized directly within their respective containers by dragging their edges.
- CSS is injected live, eliminating the need to manually save changes.
- When redocking the Preview, any manually adjusted Editor size is reset to its default dimensions.
Features:
Dock brings the undocked preview back into the editor.
Modes: (3) Page View and (4) Element View
(7) Select Element: Activates the Picker tool within the page iframe; clicking an element sets the CSS selector and switches the interface to Element View.
(8) Selector Follows Cursor: Automatically populates the selector field with the selector corresponding to the currently selected rule in the Editor.
(6) Reload Preview: Reloads the URL currently displayed in the preview window.
(1) Undock Preview: Opens the Live Preview in a separate browser window (e.g., for multi-monitor setups). B. For a Second Screen
As long as the preview is undocked, the button switches to Dock Preview.

Each save generates a revision.
There is a revision list for each file.
Restoring a file itself generates a new revision.
For comparisons, rely on timestamps, users, and visual inspection.
Base styles in global, section-specific styles in the corresponding section, and targeted fixes later with a higher sort order.
Use increments of 10 for each section to leave room for intermediate values.
Order: global -> header -> footer -> context-specific files.
Header: e.g., header/nav.css, header/critical-hero.css; focus on navigation, branding, sticky elements, and above-the-fold content
Footer: e.g., footer/base.css; focus on columns, legal information, newsletters, and widgets
.site-header and .site-footer are suitable targets for the preview
Assignments are typically left empty if the file is intended to apply site-wide
New File: Navigate to the target folder in the Explorer -> Click New File -> Enter a filename ending in .css -> The file appears immediately in the Explorer, the table, and the Editor -> Verify the Area/Status/Sorting settings -> Write CSS -> Save -> Check the preview
New File via Context Menu: Right-click in an empty area on the right side of the Explorer -> Select New CSS File -> Enter a filename ending in .css -> The file is created and opens in the Editor
Page-Specific CSS: Click Create Page CSS -> Select a page -> The file is generated as page/slug-id.css -> Customize the content
Open File: Double-click a CSS file in the Explorer -> The file opens directly in the Editor tab
Favorite a CSS File: Right-click a .css file -> Select Add to CSS Favorites -> The file appears on the left under CSS Favorites and can be opened directly from there with a single click
Header Fix: Create header/nav.css -> Write styles -> Set Element View to .site-header
Footer Fix: Create footer/base.css -> Write styles -> Set Element View to .site-footer
Customizer Migration: Click Import -> Review the file -> Split and sort the contents
Preview empty or console full: Set the preview URL to the same domain and use HTTPS; scripts within the iframe are removed.
Selector not found: Pseudo-element or non-existent target; click on a real element using the picker.
Explorer remains empty: Perform a hard refresh of the admin page and check the browser console; this is often caused by an asset cache or a blocked script.
File does not appear: Run Reload in the Explorer, and verify that the filename ends in .css and that the path is located under wp-content/uploads/lcs-custom-css/.
File is marked in red as „unassigned“: This is merely an indication. The UI does not detect any object, path, or scope assignment; check the Scope, Path, and „Assignments“ fields.
File downloads instead of opening in the editor: Update plugin assets and clear the cache.
„New CSS File“ is missing from the context menu: Right-click on an empty area of the file list (not on a specific file or folder row).
„Add to CSS Favorites“ is missing: Verify that you have indeed clicked on a single .css file; folders utilize elFinder’s native „Favorites“ feature.
CSS Favorite does not appear: Check your browser storage/LocalStorage; private browsing windows or restrictive browser settings may prevent local storage.
CORS or Mixed Content errors: Adjust the preview URL to use the correct domain and protocol.
Nonces and capabilities applied to all actions
Path and file type validation: .css files only, no .. segments, restricted to the working directory
Upload folder is created on demand; insufficient permissions result in an error message
No theme lock-in: files are retained when switching themes
Recommendation: Create backups and revisions before making major changes
The WordPress plugin list reads the version from the header of lcs-custom-css.php.
The plugin itself uses LCS_CUSTOM_CSS_VERSION; the header and the constant must be identical.
The release date is stored in LCS_CUSTOM_CSS_RELEASE_DATE.
Minor fixes and UI improvements increment the patch version sequentially—e.g., 1.0.13, 1.0.14, 1.0.15.
Major new features increment the minor version; incompatible changes increment the major version.
SCHEMA_VERSION is reserved exclusively for changes to the database structure and is maintained independently of the plugin version.
Few, clearly named files instead of many fragments
Critical CSS in the header, non-critical CSS later in the footer
Shared styles in global, variants via assignments or specialized files loaded later
Save: Ctrl/Cmd + S
Close active tab: Ctrl/Cmd + W
Search: Ctrl/Cmd + F
Replace: Ctrl/Cmd + H
Multiple cursors: Alt + Click or Ctrl/Cmd + Alt + Arrows
Configure the uninstall behavior in the settings.
Deactivate the plugin and click Delete.
If the Tables + Uploads option is selected, everything is removed; otherwise, data is retained.
In the WordPress backend, open the LCS Custom CSS menu item. The main page consists of the editor area, the file explorer, the live preview, and the file table.
Typically, you should work from top to bottom:
- Create or open a file in the explorer
- Review the metadata in the form
- Edit the CSS in the editor
- Use the preview
- Save
- Verify the status, assignment, and description in the file table
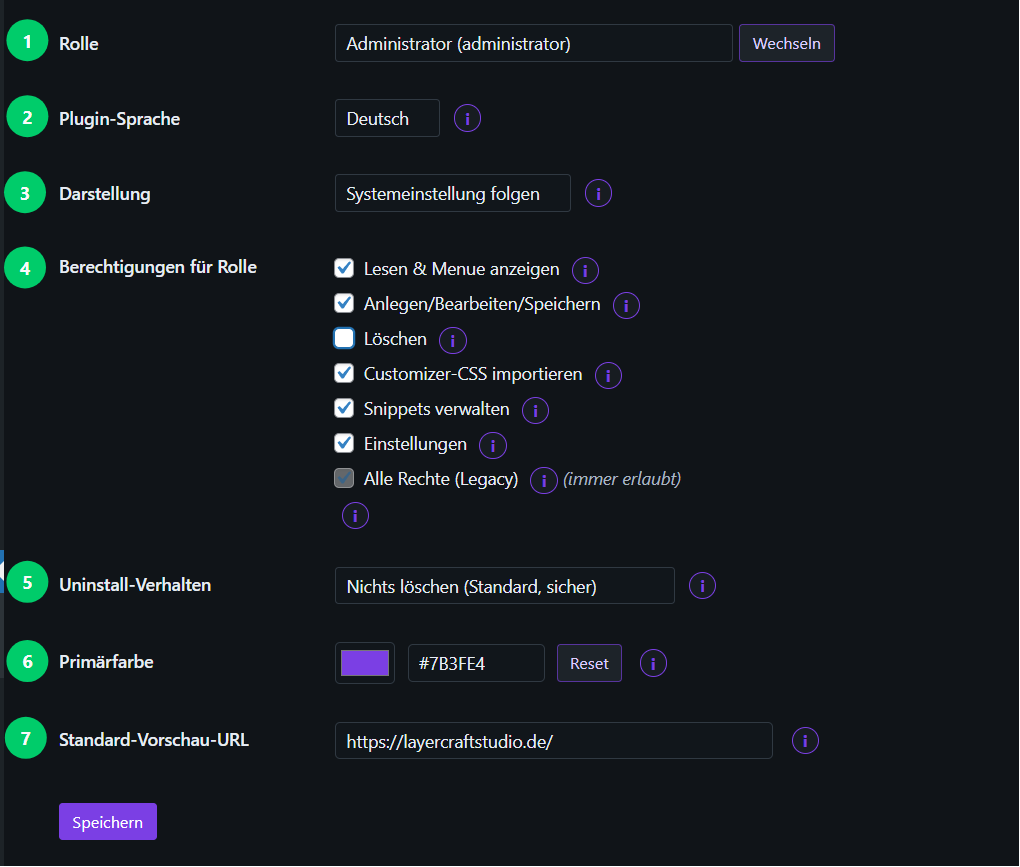
You can access the settings via LCS Custom CSS > Settings. Here, you can manage user roles, plugin language, appearance, primary color, default preview URL, and uninstall behavior.
Review the settings completely before beginning your actual work:
Select Role: First, select the role you wish to edit, then click „Switch.“
Select Plugin Language: Choose the language for the plugin interface for your specific user account. Other users may select their own preferred language.
Select Appearance: Choose between „Light,“ „Dark,“ or „Follow System Setting.“ Your selection is saved specifically for your user account. „Follow System Setting“ automatically switches the theme based on your browser or operating system preferences.
Set Permissions: Enable the necessary permissions, such as „view,“ „edit,“ „delete,“ „import,“ or „settings.“
Set Primary Color: Manually enter a HEX value, use the color picker, or click „Reset“ to revert to the default value (#7B3FE4). This change applies only to the plugin’s administration pages.
Define Uninstall Behavior: Specify what should be removed when the plugin is deleted: „Nothing,“ „Tables Only,“ or „Tables + Upload Directory.“
Set Default Preview URL: Enter the domain and protocol for the page that should be loaded in the preview window.
Read Help Texts: Click the round „(i)“ buttons located next to the input fields to display brief explanatory notes. For the „Primary Color“ and „Default Preview URL“ fields, the help text consists of two lines.
Save: Click „Save“ at the bottom of the page to permanently store your changes within WordPress.
The quickest method is via the Explorer:
Open the desired folder—for example, global, page, header, or footer.
Click „New File“ on the Explorer toolbar, or use the „New CSS File“ option in the context menu within the empty area of the file list.
Enter a filename ending in .css.
The file will appear in the Explorer, in the table, and directly in the Editor tab.
In the form, verify the Path (.css), Scope, Status, and Sort Order settings.
Write your CSS and save the file.
For page-specific files, you can alternatively use the „Create Page CSS“ option. The plugin will then automatically generate an appropriate path within the page folder.
You can open files in several ways:
Double-clicking a .css file in the Explorer opens it directly in the editor tab.
Clicking a CSS favorite also opens the file directly.
In the file table, you can review existing entries and, depending on the action, edit them again.
When editing:
The active tab is color-highlighted; unsaved tabs display a red dot.
„Save“ saves only the active tab.
„Save & Clear“ saves the active tab and then replaces it with an empty tab.
„Clear“ discards the current content—after a confirmation prompt—without saving.
Ctrl/Cmd + S saves the active tab.
When closing a tab with unsaved changes, a confirmation prompt appears.
Check these three fields for every new file:
Status: Only actively loaded files are displayed in the public frontend. „Inactive“ is suitable for drafts.
Area: „Global,“ „header,“ and „footer“ apply site-wide. „Page,“ „post,“ „archive,“ „category,“ „tag,“ and „custom_post_type“ are context-specific.
Sorting: Lower numbers load earlier. Use increments of 10—e.g., 10, 20, 30—so that you can insert files in between later on.
If a file does not appear in the frontend, first check its Status, Area, Assignment, and Sorting.
Assignments determine which content a file applies to.
Manual Entry:
Enter one assignment per line in the „Assignments“ field.
Examples: page:12, post:34, category:5, tag:7, home:0, product_archive:0.
An empty field indicates that the file applies to the entire selected scope.
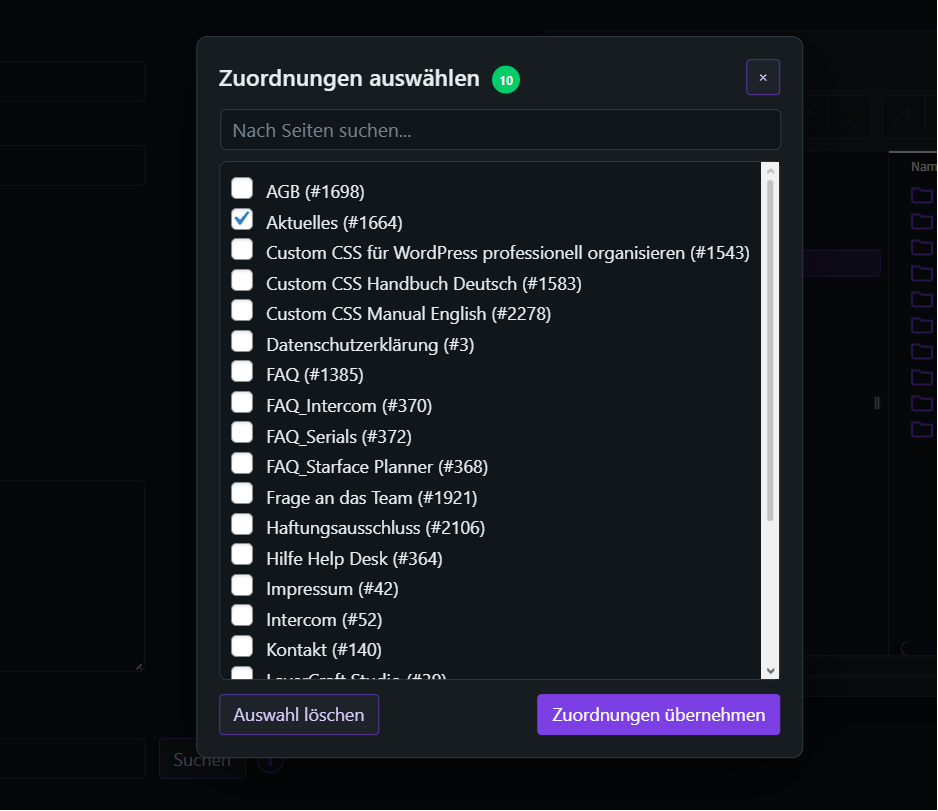
Selection via Modal:
Click „Select Assignments.“
Search for pages or content items.
Check the desired boxes.
Confirm your selection.
Save the file.
The file table displays the first detected assignment directly. Additional assignments can be expanded via the detailed view.
The Live Preview helps you verify your work before saving.
„Live Preview Active“ injects the current editor content directly into the loaded preview page.
„Reload Preview“ reloads the URL.
„Page View“ displays the complete page.
„Element View“ displays a selected element in isolation.
„Select Element“ activates the picker within the preview iframe.
„Selector Follows Cursor“ automatically adopts the selector from the current rule in the editor, whenever possible.
„Pop Out Preview“ opens the preview in a separate window.
„Dock Preview“ brings the popped-out preview back into the main interface.
As long as the preview is popped out, the control panel—containing the URL, mode, reload button, picker, and dock button—remains visible on the right side.
In wider viewports, the editor expands to fill more space, though it is capped at approximately two-thirds of the available workspace width.
When docking the preview, the editor reverts to its default size, even if its dimensions had previously been adjusted manually.
If the preview remains blank or appears to be malfunctioning, please check the default preview URL, HTTPS settings, domain configuration, CORS settings, and for any mixed content issues.
CSS Favorites provide a quick way to access files within the Explorer.
In the Explorer, right-click on a .css file.
Select „Add to CSS Favorites.“
The file will appear in the CSS Favorites section on the left.
Click on a favorite to open the file directly in the Editor tab.
To remove a favorite, right-click on it and select „Remove from CSS Favorites.“
Important: CSS Favorites are stored locally within your browser. They are not file metadata and are not synchronized across different browsers or devices.
Titles and descriptions aid in the maintenance of larger CSS collections.
In the file table, open the additional row for comments/descriptions.
Enter a descriptive title if you want the tab and the table to display more than just the file path.
If necessary, add a description detailing the purpose, context, or dependencies.
Save the metadata using the button in the additional row.
These metadata are intentionally saved without creating a revision. CSS content, by contrast, generates revisions upon saving.
A new revision is created every time a CSS file is saved.
Here is how to use revisions:
Open or select the file in question.
Scroll to the Revisions section.
Use „Diff“ to check for differences compared to the current version.
Use „Restore“ if you wish to revert to an older version.
Afterward, review the file and save it again if necessary.
Restoring a file itself creates a new revision.
The import function transfers CSS from the WordPress Customizer into a file.
Verify that your user role possesses the ‚import‘ capability.
In the Import section, click „Import Customizer CSS.“
The plugin saves the content to global/imported-additional-css.css.
The original content within the Customizer remains intact.
Subsequently, review the status, sorting, and content of the imported file.
If necessary, split large imported blocks into multiple thematic files.
Example: You want to manage CSS for a contact page.
Open LCS Custom CSS.
Click „Create Page CSS.“
Select the contact page.
Verify the generated path, e.g., page/kontakt-123.css.
Set the status to „Active.“
Check that the assignment page:123 is set.
Write your CSS in the editor.
Set the preview URL to the contact page.
Enable the live preview and check the effect.
Save the file.
Review the file table: Status, Scope, Assignment, and Sort Order.
Open the page in the frontend and check the result without the admin preview.
– Each CSS file has its own version and starts at `0.0.1`.
– Real CSS content changes show a dialog with patch, minor and major by default.
– The dialog shows the next version number for the selected bump type.
– The commit field is optional.
– Metadata-only saves do not show the commit dialog and do not change the version.
– The file table shows the current version between path and area.
– The revisions table shows version and commit per snapshot.
This plugin is currently in a beta phase.
No warranties are provided regarding its functionality, availability, or fitness for a particular purpose.
Use is entirely at your own risk.
Prior to deployment in a production environment, conducting your own tests and creating backups are mandatory.